Popcosmo

BLOG TIPS

Really Cool Business Cards

All, BLOG TIPS, EXTRASKim & Chloe8 Comments

You all know that I I adore designing websites and and logos and have really enjoyed being able to design them for other people. So it's no surprise that I'm obsessed with looking at other peoples websites. But what I love even more than websites is business cards. Perhaps it's because my mom always says that "you never get a second chance to make a first impression." And when it comes to introductions of your blog, website or business, this advice is also true, which is why I think my mom and I are obsessed with business cards. When someone hands me a card that feels good, looks good, and somehow captures their character or the character of their blog, then I am totally impressed. And what do I do when I'm impressed (besides gushing so much that I not only embarrass them but also make a fool of myself)? I scope out their website! And isn't that exactly what you want someone to do when you hand them your card? As we've probably mentioned, we were at the #CricutExplore event sponsored by Cricut earlier this week. We were humbled to be invited with so many top crafting bloggers and meet people we'd been reading. We received some cool business cards, just a few of which we'll share with you. I wish we could have gotten a card from everyone (and I wish I could have taken the entire week off and stayed for Alt so I could have seen and learned more)! Next year….

cool business cards

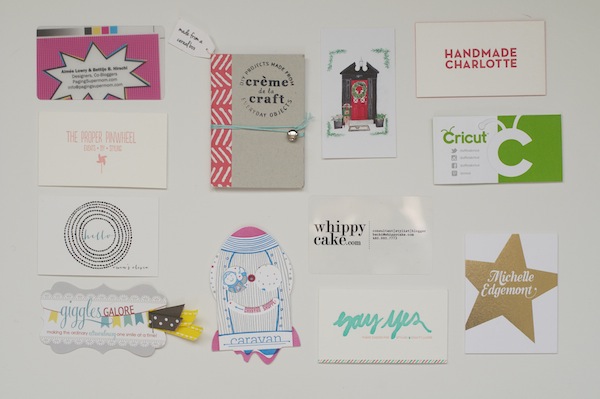
left: The Proper Pinwheel's card is packaged in a clear pillow enveloped with an included tiny DIY banner in her color scheme and glitter dots and paper shreds which makes you feel like you are unwrapping a present. Sort of like when you scroll through her blog, it's a real treat!

middle: the card by Say Yes is bright and cheery, just like the site. Three cheers for perfect branding!

right: ok, so Kori Clark not only drew the spot near where I used to live and had my Bat Mitzvah in Rosemary Beach, Florida (is it a small world or what?!) but has the perfect card to showcase her talent as an illustrator and stationery designer. Her card folds fold up, there are 2-sided cards with her beyond adorable drawings inside.

business cards from alt

left: creativity without spending a cent? Crème de la Craft created her cards from cereal boxes, which represents her blog, since it's tagline is "DIY projects made from everyday objects."

middle: Handmade Charlotte's card is chic and simple with a bright back. It's bold and stands out, which totally matches Charlottes playful, sweet and generous personality.

right: sometimes simplicity speaks for itself, as in Brooklyn wedding designer Michelle Edgemont's bold gold leaf foil star.

creative business cards

left: Caravan Shoppe made an interactive rocket. Need we say more from a brand that creates downloadable templates for  you to create fab paper products at home. Branding perfection!

middle: The Cricut Explore cuts, scores, draws and cleans your room. Well, it probably could do the latter since it seems like it can do just about anything. And since a regular shape card turns into an origami-like box that I'm displaying on my desk, I'd say not only is the Cricut Explore a piece of art, so is this business card.

right: So my mom might have a girl crush on Whippy Cake and her adorable retro style and fashion-forward hair, and trust me, you will too when you take a look at her blog. Her card is simple and refreshing… just like her!

really cool business cards

As you might have noticed, I've changed the look of our blog a few times lately and we are pretty close to being finalized with how we like it. Pretty close! Which means, you guessed it, I can start designing our new business cards on Minted. And I have plenty of inspiration thanks to my new friends.

xo ~chloe

How to Get Traffic to your Website from Instagram

All, BLOG TIPS, EXTRAS, RANDOM STUFFKim & Chloe34 Comments

how to get traffic from Instagram Once we published our Instagram tips & tricks, we received lots of questions about Instagram, but the 2 that stood out were (a) what's the best way to get traffic to your website from Instagram without using a contest or giveaway & (b) how do I get my blog post pictures on Instagram? Here you go... our quick and simple answers with our tips to make the most of your Instagram!

The best way to get traffic to your blog posts is pretty common sense (but here area a few reminders):

1. A “sneak peak” or teaser picture. These pictures give your followers an insider look of an upcoming post or you could be working behind the scenes on your post. The goal? Curiosity! The next day we posted the finished product that we created with the items below, but aren't you dying to know what we made with napkins?! {Hint: who says Halloween can't be pink & green!}

2. Highlighting your most popular posts from the week or month on Instagram. Your readers might have missed a craft, outfit, or story and will be intrigued and want to check them out.

3. Last but not least, simply be yourself and create compelling and cohesive Instagram content. Your Instagram feed should have a unique style - this is our #1 tip! Create your own look and stick with it, just like you have your voice on your blog, you have your "look" or style on Instagram. Don't you always want to see the blog when you love the Instagram account? I do!

Besides the fact that Instagram is a compelling way to tell a visual story of your brand, just remember that it's a window into your website.

The other question that we are asked is “how the heck do I get a picture from my camera onto Instagram?” A lot of people pride themselves for solely taking iPhone pictures; however, if you want show your high quality work from a camera, fantastic. But please, don't tell everyone you take iPhone pics when you’re really using your super fancy DSLR - in other words, don't use "#nofilter". Ok? Ok. So here's how you get those fancy pics to Instagram:

1. Once you upload your pictures to your computer from your camera:

  • Email the picture you want to upload to yourself.
  • Then, open the picture on your phone from your mail app.
  • From there, just click the picture in your email and it will ask you what you want to do.
  • I typically save to camera roll and then open it up in one of my editing apps (click for an for editing app tutorial).  OR if you don't use editing apps, open Instagram and it will be in your Camera Roll.

If the picture file is too big, you may need to take a screen shot of the picture on your computer or your phone. This takes two seconds so it’s not a big deal!

2. Another way to post a blog picture onto your Instagram is after you’ve posted your picture on your blog,

  • Open your website on your phone.
  • Then click the image you want to use and save to camera roll.
  • Again, you'll simply need to open up Instagram or an editing app to access the photo.

Although it's another step to take in your daily blogging routine, Instagram is a fabulous way to drive traffic to your website with a quick visual peek into what you are doing... and tease your readers just enough so that they will be dying to check out what the rest of your post is all about. And we've found it draws in readers with everything from fashion posts, to DIY, to random stuff.

And hey, are you following us on Instagram @popcosmo!?

There 'ya go! Instagram those blog posts & let us know if you have any questions.

xox ~chloe


#ChicChat

BLOG TIPS, EXTRASKim & Chloe7 Comments

#ChicChat for teens

Join us on Twitter every Tuesday night from 9-9:30 EST for a brand new chat: #ChicChat! I'll be chatting about teen blogs and blogging... and more! Our goal is to have a chat for teens to collaborate, learn, share knowledge, and develop relationships with fellow teen bloggers.

October 1: Introduce your blog and yourself. Why did you start blogging and what are your goals? Let's visit each other's blogs comment on each other's posts!

October 8: What has been your most popular post? What post should have been popular? Don't be shy! We want to learn from each other - what worked and why? What post surprised you, disappointed you?

Looking forward to chatting with you, just use #ChicChat and you'll join us! Also, follow us on Twitter (@popcosmo) and let us know you'll be joining so we can send you a reminder!

If you want to learn more about Tweet Chats, check out the who, what, when, where, and why's here!

xox ~chloe


Twitter Lists: How to Declutter your Twitter Stream

All, BLOG TIPS, EXTRASKim & Chloe18 Comments

There is a very simple solution to declutter your Twitter stream... and it's sitting right in front of you. It's called a Twitter List. Yet you may be ignoring it. We were! But we've recently started using this 1 simple trick, and Twitter Lists have made our Twitter interactions so much more meaningful, and easier to follow. I can follow my SITS friends, my BlogHer friends, my hometown friends, and even other people's public lists. Why didn't I start using this simple trick sooner?! Twitter Tips

For those of you not familiar with Twitter Lists, I'll explain why they are so critical, plus I'm going to walk you through how to create them (it looks complicated, but it's simple!) both on Twitter and on HootSuite. What's nice is your Twitter list will automatically appear on the other social media site once you create it. So I recommend going to where you are most comfortable to create a list. Personally, I prefer creating a list on Twitter and populating it on HootSuite.

Twitter:

1. Click Me

2. Click the gear on the top right and highlight Lists from the dropdown menu

3. Click Create list

4. Name your list and describe your list (optional)

5. Click public or private

6. Click save list

twitter lists to make twitter manageable

7. To add people (a) in the following list or when you search for a friend (b) click on the person icon (c) click add to list.  Then check the name of the list to which you want to add them. That's it, they are added! Alternatively, you can search for people you want to add to your list and they can be added by clicking (d) add to list.

twitter lists

how to make a twitter list 1


HootSuite:

1. Add Stream (make sure you are in Twitter!)

2. Click Lists

how to use twitter lists

3. Select your Profile name (i.e., ours is Popcosmo)

4. (a) If you created your list in Twitter, you'll see the name of the list (ours is "Popcosmo Peeps") so click "Use Existing List" and  the name of the list you created OR (b) name your list, and optionally you can describe your list

5. Click public or private

6. Click Add Stream. Now you'll have a dedicated stream for those tweeps!

how to create a twitter list in hootsuite

7. To add people:

a. While you are in your stream, click the the ICON of the person (icon is to the left of the twitter name) of any twitter name in any stream. You can then simply click and drag them into your stream. You will know they are added when you see the big green plus sign in your stream. OR

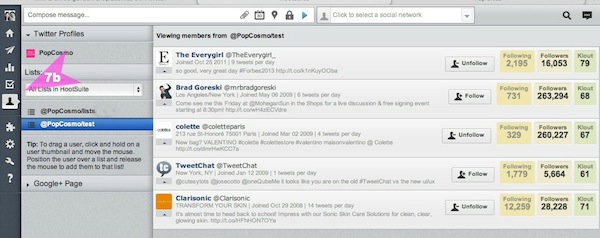
b. Click the person icon in the grey box on the far right. Highlight your profile and see all those you follow. Click and drag the icon to your list and you'll know they are added when you see the big green plus sign. Hint: Click on your list to see who's in it while adding, instead of having to go to your stream.

What are Twitter Lists 3

How (and WHY) to Use Lists:

In Twitter: Click on Me and then Lists. Click on the list you want to see.

In HootSuite: You have a stream for your list!

The clutter is gone and all you should see is a stream from those people in your list. A list makes it so easy to ignore all those tweets that distract you from focusing on what you should be focusing on. {For me that means gaining hours of productivity!! No more looking at fashion photos while I should be writing or gazing longingly at your Instagrams!} With a Twitter list I can decide WHO I want to see in a stream and WHEN! All it takes a few minutes to set up a Twitter list and you've got a streamlined Tweet-erverse right at your fingertips.

Why does this matter? Once you start interacting and re-tweeting people, you'll start seeing them doing the same with you and Twitter becomes what it originally was when you only followed a few people: a conversation. It also becomes a wonderful resource for information. And it can become an invaluable asset for promoting your blog and sharing the information you have created. Twitter is give and take relationship, one which is hard to be in when there's so much "noise." Without the distraction of excess "noise" on Twitter, you can focus on those friends and people who you want to focus on, and start seeing the real benefits of Twitter.

Happy Tweeting!

Instagram Tips

All, BLOG TIPS, EXTRASKim & Chloe25 Comments

Instagram has started to become my favorite social media platform. You might be asking yourselves how I like it better than Pinterest, and there is only one answer - it’s more personal. I feel like my personality can shine through more on Instagram, plus it’s kind of a game with the likes and comments :lol: . The only thing is, there are so many new editing apps that are created everyday, it’s hard to stay up to date with the cool things you can do.instagram ideas Most instagram tips will tell you how to take better pictures, how to show your personality, and how to use the filters. But no longer do the plain old Instagram filters suffice - you have to use an outside source. I’m all for it! I love me some editing. So I'm going to share my most recent Instagram find with you: I recently started using the VSCOcam app (available in the app store), and I love it. It replaces all the other complicated apps because it’s easy to use and it has some really cool features. So no complicated Instagram tips, just one big tip and how to use use my favorite tool!

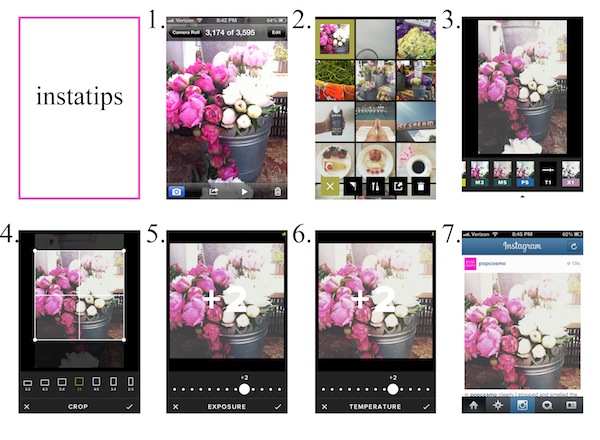
Here’s a little peek on how I typically edit a picture....

instagram tips

This whole process takes about five minutes - that's including taking the picture itself. It’s not too slow which is why I love using just one app. I’ve heard of people using up to three separate apps per picture, but for me that just takes away from the insta in Instagram.

{1} Clearly you have to choose your picture. I usually take a bunch and then pick from the best one.  I have way too many pictures on my phone, but it just feels so wrong to delete them in case "who knows what" happens. And by that, I mean my little brother.

{2} I then open up my picture in VSCOcam.

{3} I love the filters that are already in this app. I almost always use the T1 filter  because I like the white wash it gives the photo. Choosing the filter is totally up to you, and remember: your personality should shine through! I also like G3 and M5.

{4} I then crop my photo so that it’s a square so I can make sure I will like it once I post it to Instagram. If you have a taller/wider picture and want white space on the edges, I recommend the app Whitagram, another one of my favorites.

{5} I then jack up the exposure, because I like the effect it gives the photo. Clearly this is where your originality starts to shine through, and your tastebuds do the choosin’.

{6} Depending on the picture, I either slide the temperature up or down. This feature either puts more color into your picture or takes some away. See how my photo is just... softer?

{7} Lastly, upload to Instagram! Follow us and check us out to see what I've been doing lately with our photos - I'd love to hear what you think!

I hope this helps you find your own style a little bit!  And I'd love to hear more...

How do you typically edit your pictures? Are you a fan of VSCOcam?

3 simple steps to make a round picture

All, BLOG TIPS, EXTRASKim & Chloe7 Comments
chloe-60stint.png

Have you seen all those cute round avatars or round pictures on sidebars? It took me forever to make ours until I learned how simple it could be! So I'm sharing the simple way to make a round picture with you. The secret is... my favorite photo editing tool: PicMonkey - and if you aren't using it then I suggest you start. If you are, then you already know it rocks. (And no, they are not paying me to say this - but I'd say the same thing if they were! I just love them, plain & simple.) PicMonkey is a very simple photo editor and is quite intuitive. Chloe uses PhotoShop and loves it, but it's complicated to simple folk like me. And there are rumors of a rental fee now, so it doesn't seem like a great time for me to start learning it. chloe - 60's plain

Something I learned recently is that it is quite simple to take any online photo and and turn it into a round picture. I should have learned this a long time ago, but just wasn't experimenting enough! Not only can you make a round picture, but you can also make it look fun and funky in an instant.

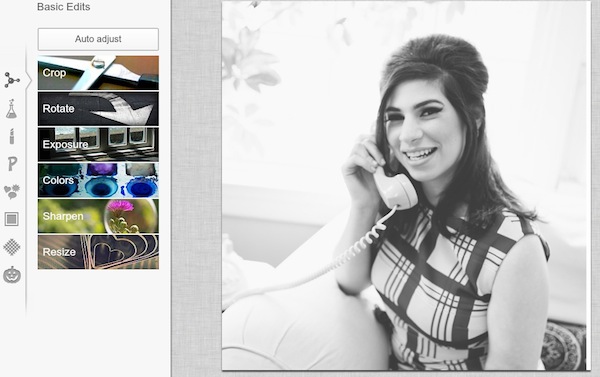
Here's how: 1. Drag a picture to the PicMonkey editor.

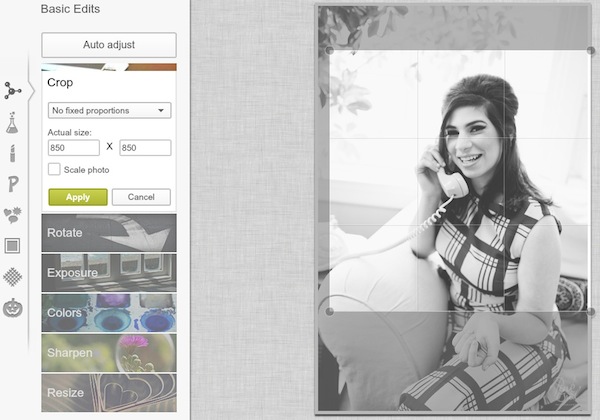
2. In Basic Edits CROP the photo to make it square by simply making the actual size of equal length and width.

PicMonkey tips

How to use PicMonkey

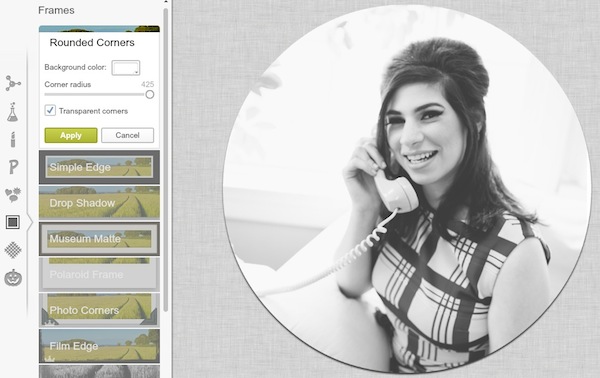
3. in Frames under Rounded Corners, round them until you have formed a circle by dragging the corner radius to 222 degrees. Click "transparent corners." And then you have your round picture!

making pictures round

PicMonkey Tips & Tricks

To get funky with your round picture... goto Effects and play!

chloe - 60'stint


Well now, that's as easy as... 1, 2, 3! So what are you waiting for? Jazz up your photos and start making them round pictures! It's not hip to be square :)

Any questions? Leave them in the comments! Or do you have another way to make round pictures -- I'd love to hear!