Popcosmo

All

Really Cool Business Cards

All, BLOG TIPS, EXTRASKim & Chloe8 Comments

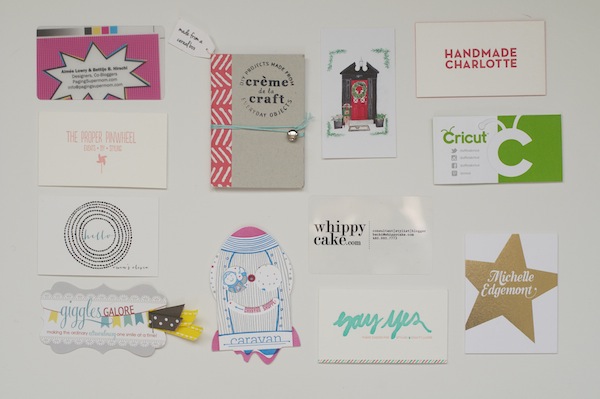
You all know that I I adore designing websites and and logos and have really enjoyed being able to design them for other people. So it's no surprise that I'm obsessed with looking at other peoples websites. But what I love even more than websites is business cards. Perhaps it's because my mom always says that "you never get a second chance to make a first impression." And when it comes to introductions of your blog, website or business, this advice is also true, which is why I think my mom and I are obsessed with business cards. When someone hands me a card that feels good, looks good, and somehow captures their character or the character of their blog, then I am totally impressed. And what do I do when I'm impressed (besides gushing so much that I not only embarrass them but also make a fool of myself)? I scope out their website! And isn't that exactly what you want someone to do when you hand them your card? As we've probably mentioned, we were at the #CricutExplore event sponsored by Cricut earlier this week. We were humbled to be invited with so many top crafting bloggers and meet people we'd been reading. We received some cool business cards, just a few of which we'll share with you. I wish we could have gotten a card from everyone (and I wish I could have taken the entire week off and stayed for Alt so I could have seen and learned more)! Next year….

cool business cards

left: The Proper Pinwheel's card is packaged in a clear pillow enveloped with an included tiny DIY banner in her color scheme and glitter dots and paper shreds which makes you feel like you are unwrapping a present. Sort of like when you scroll through her blog, it's a real treat!

middle: the card by Say Yes is bright and cheery, just like the site. Three cheers for perfect branding!

right: ok, so Kori Clark not only drew the spot near where I used to live and had my Bat Mitzvah in Rosemary Beach, Florida (is it a small world or what?!) but has the perfect card to showcase her talent as an illustrator and stationery designer. Her card folds fold up, there are 2-sided cards with her beyond adorable drawings inside.

business cards from alt

left: creativity without spending a cent? Crème de la Craft created her cards from cereal boxes, which represents her blog, since it's tagline is "DIY projects made from everyday objects."

middle: Handmade Charlotte's card is chic and simple with a bright back. It's bold and stands out, which totally matches Charlottes playful, sweet and generous personality.

right: sometimes simplicity speaks for itself, as in Brooklyn wedding designer Michelle Edgemont's bold gold leaf foil star.

creative business cards

left: Caravan Shoppe made an interactive rocket. Need we say more from a brand that creates downloadable templates for  you to create fab paper products at home. Branding perfection!

middle: The Cricut Explore cuts, scores, draws and cleans your room. Well, it probably could do the latter since it seems like it can do just about anything. And since a regular shape card turns into an origami-like box that I'm displaying on my desk, I'd say not only is the Cricut Explore a piece of art, so is this business card.

right: So my mom might have a girl crush on Whippy Cake and her adorable retro style and fashion-forward hair, and trust me, you will too when you take a look at her blog. Her card is simple and refreshing… just like her!

really cool business cards

As you might have noticed, I've changed the look of our blog a few times lately and we are pretty close to being finalized with how we like it. Pretty close! Which means, you guessed it, I can start designing our new business cards on Minted. And I have plenty of inspiration thanks to my new friends.

xo ~chloe

5 Things on Repeat

All, EXTRAS, RANDOM STUFFKim & Chloe7 Comments

5 Things Do you ever get the feeling that you just repeat yourself day in and day out? I do. Constantly. Sometimes, I feel as if I could simply record myself  and nobody would even notice I wasn't around. I'm still not sure if Chloe  feels like she repeats herself, and by the time we get halfway through the video we're both completely confused about we're even doing, but at least we had fun (as usual) making 5 Things on Repeat.

Watch for yourself and see what you think. And let us know if you have any phrases on repeat that drive you (or someone else) crazy.


Happy New Year!

All, EXTRAS, RANDOM STUFFKim & Chloe3 Comments
twentyy14.jpg

2014

Wishing you all the happiest, healthiest, most fun & joyous New Year. Thank you ALL for being a part of our lives and sharing a precious part of your time with us. Your friendship, because it truly is, whether it's here on our website, on Twitter, through Bloglovin', Pinterest, Facebook, in real life or through comments mean the world to us and we look forward to seeing you all in 2014.

xoxox ~kim & chloe


How to Get Traffic to your Website from Instagram

All, BLOG TIPS, EXTRAS, RANDOM STUFFKim & Chloe34 Comments

how to get traffic from Instagram Once we published our Instagram tips & tricks, we received lots of questions about Instagram, but the 2 that stood out were (a) what's the best way to get traffic to your website from Instagram without using a contest or giveaway & (b) how do I get my blog post pictures on Instagram? Here you go... our quick and simple answers with our tips to make the most of your Instagram!

The best way to get traffic to your blog posts is pretty common sense (but here area a few reminders):

1. A “sneak peak” or teaser picture. These pictures give your followers an insider look of an upcoming post or you could be working behind the scenes on your post. The goal? Curiosity! The next day we posted the finished product that we created with the items below, but aren't you dying to know what we made with napkins?! {Hint: who says Halloween can't be pink & green!}

2. Highlighting your most popular posts from the week or month on Instagram. Your readers might have missed a craft, outfit, or story and will be intrigued and want to check them out.

3. Last but not least, simply be yourself and create compelling and cohesive Instagram content. Your Instagram feed should have a unique style - this is our #1 tip! Create your own look and stick with it, just like you have your voice on your blog, you have your "look" or style on Instagram. Don't you always want to see the blog when you love the Instagram account? I do!

Besides the fact that Instagram is a compelling way to tell a visual story of your brand, just remember that it's a window into your website.

The other question that we are asked is “how the heck do I get a picture from my camera onto Instagram?” A lot of people pride themselves for solely taking iPhone pictures; however, if you want show your high quality work from a camera, fantastic. But please, don't tell everyone you take iPhone pics when you’re really using your super fancy DSLR - in other words, don't use "#nofilter". Ok? Ok. So here's how you get those fancy pics to Instagram:

1. Once you upload your pictures to your computer from your camera:

  • Email the picture you want to upload to yourself.
  • Then, open the picture on your phone from your mail app.
  • From there, just click the picture in your email and it will ask you what you want to do.
  • I typically save to camera roll and then open it up in one of my editing apps (click for an for editing app tutorial).  OR if you don't use editing apps, open Instagram and it will be in your Camera Roll.

If the picture file is too big, you may need to take a screen shot of the picture on your computer or your phone. This takes two seconds so it’s not a big deal!

2. Another way to post a blog picture onto your Instagram is after you’ve posted your picture on your blog,

  • Open your website on your phone.
  • Then click the image you want to use and save to camera roll.
  • Again, you'll simply need to open up Instagram or an editing app to access the photo.

Although it's another step to take in your daily blogging routine, Instagram is a fabulous way to drive traffic to your website with a quick visual peek into what you are doing... and tease your readers just enough so that they will be dying to check out what the rest of your post is all about. And we've found it draws in readers with everything from fashion posts, to DIY, to random stuff.

And hey, are you following us on Instagram @popcosmo!?

There 'ya go! Instagram those blog posts & let us know if you have any questions.

xox ~chloe


Striped Pumpkin

All, DIYKim & Chloe10 Comments

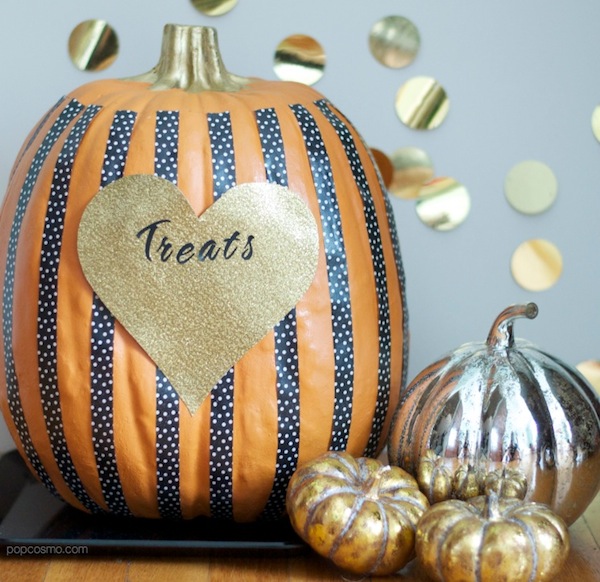
Thanks to BuzzFeed (yeah, that BuzzFeed!) for featuring the 1st pumpkin on their front page and also for the super chic ladies at The Chic Site for sharing our interview with their readers. On The Chic Site, you can get the scoop on how we work together, what inspires us, and what leads to arguing {hey, we're human}! But back to pumpkins.... We're enjoying the ease and simplicity of decorated no-carve pumpkins this year! While our pink & green Lilly Pulitzer pumpkin is an option, we also wanted a more traditional black and orange pumpkin, but with a twist, so we decided on a striped pumpkin, which we think is more modern and striking. Plus, it's simple and finished in under and hour. The lure of the design, like the Lilly Pulitzer pumpkin, is that the only limit is your creativity. Like spiders? Use a spider ribbon or washi tape and embellish with spiders. Like skulls? Go crazy with them! It's all up to you. We kept it clean and simple with black, white & gold while letting the orange peek through... and you know how much we like hearts.

Striped Pumpkin

Supplies:

1 craft pumpkin (not pictured) carving knife pencil paint brush gold paint Modge Podge scissors gold glitter paper ribbon in black and white pattern {tip: choose a lightweight ribbon -works best- or a non-sheer patterned washi-style craft tape}

sriped pumpkin supplies

Instructions

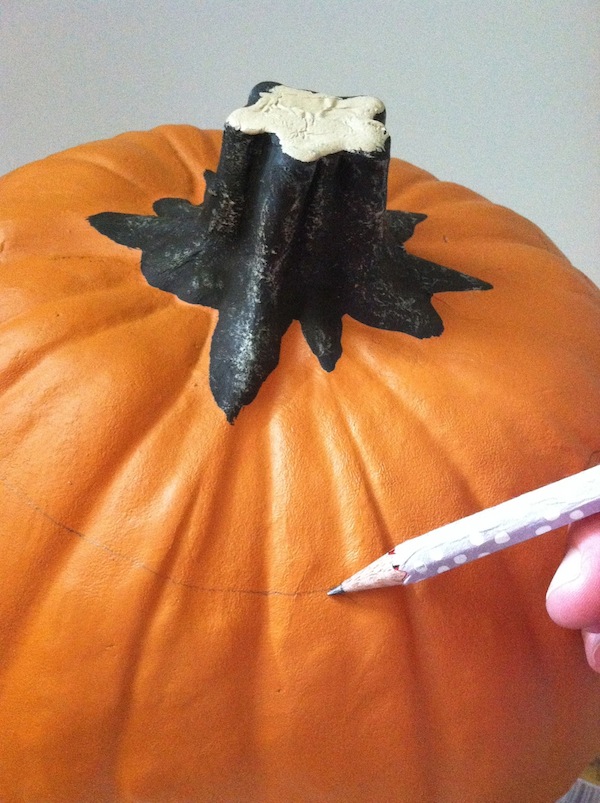
1. With your pencil, mark the area where you will carve the top of the pumpkin. Use your craft knife to carve the top of the pumpkin.

step 1- carve pumpkin

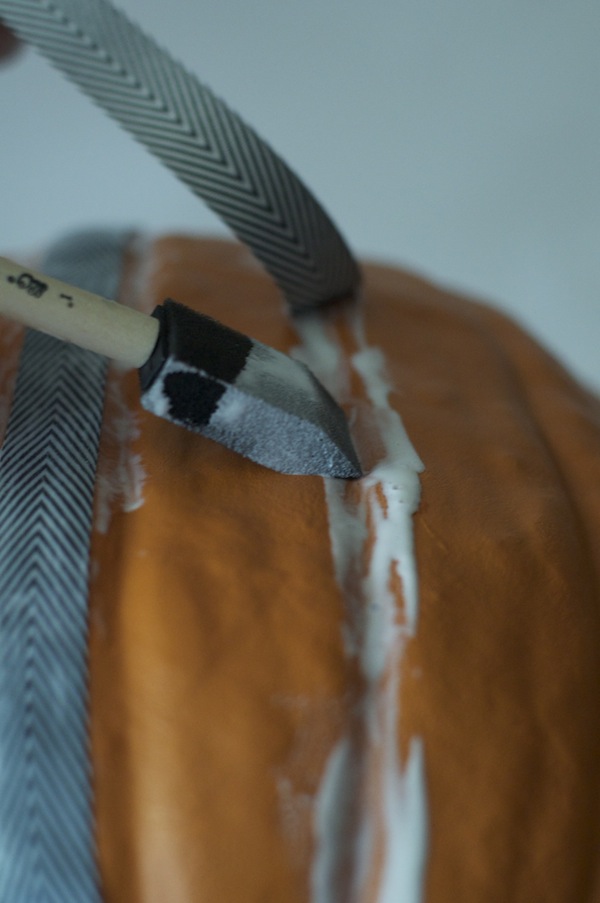
2. Apply Modge Podge in a stripe down the length of the pumpkin where you will be placing your ribbon.

striped pumpkin step 2

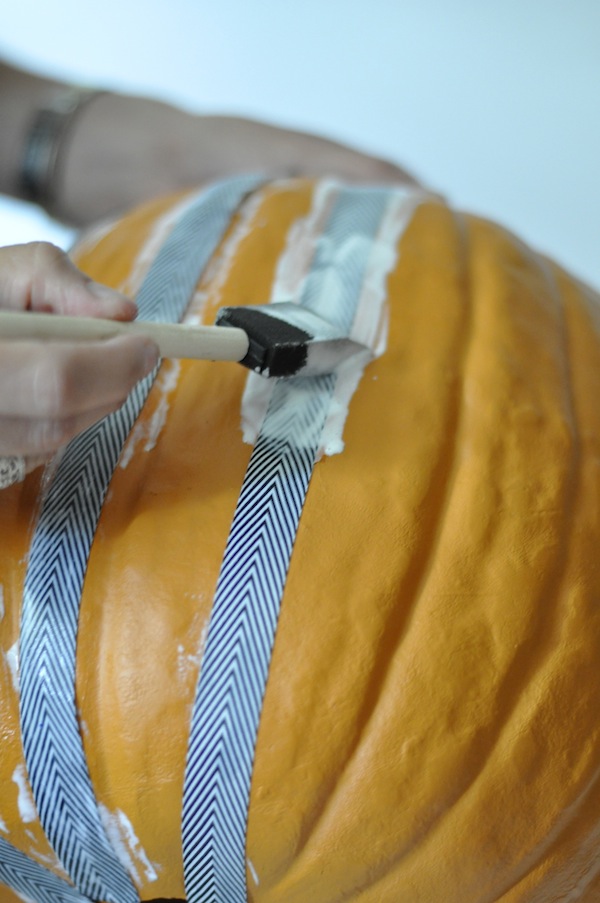
3. Firmly press your ribbon against the Modge Podge and let sit a moment. Then place Modge Podge on top of the ribbon to glue it to the pumpkin (i.e., your ribbon will be glued to the pumpkin from the top and bottom). Let dry completely.

step 3

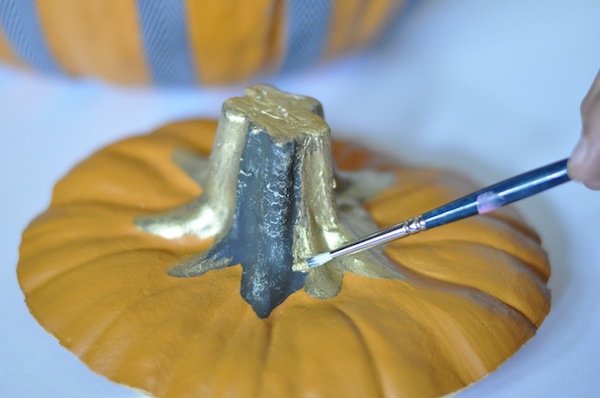
4. Paint the stem gold.

striped pumpkin step 4

5. Trace a heart to the size and shape of your liking on the back of your glitter paper. Cut out the heart shape, apply modge podge to the back, and apply to the pumpkin.

striped pumpkin step 5

6. Cover the hole inside with heavy paper, or, as we did - place it on a plate, and fill with candy.

7. Enjoy your simple carved striped pumpkin (or make it no carve if you don't want to fill it with candy)! Options: embellish the heart with letters, spiders, or whatever you and your family desire! We like candy, so we labelled it for Treats... chocolate is preferred!

Treat pumpkin

What type of pumpkins are you preparing for Halloween? Carved, no carve, decorated, painted...?

White Chocolate Peach Scones

All, EXTRAS, RECIPESKim & Chloe11 Comments
White-Chocolate-Peach-Scones-4.jpg

Another recipe from Kayla: Summer is pretty much over, which means a few things. First, there are a lot of peaches and secondly, school started. I decided to make the best of it and make a delicious breakfast before school using some of those delicious peaches. Scones are one of the fastest dishes to make, just combine the dry ingredients, add some butter and buttermilk, then fold in the peaches and chocolate. They bake for less than 15 minutes, so you can have your breakfast ready in under half an hour. If you would rather sleep a few extra minutes, just make the dough over the weekend or after school and bake it as you need it; the dough will probably last about four days in the refrigerator. These peach scones are a delicious way to start the day, and you'll never want to skip breakfast again! White Chocolate Peach Scones 5

Ingredients: 2 Cups Flour 1/3 Cup Dark Brown Sugar 1 T Baking Powder 1/2 tsp Salt 1/4 tsp Cinnamon 1/8 tsp Nutmeg Pinch Ginger 1 Stick Butter, Chilled & Cubed 3/4 Cup + 2 T Buttermilk 2 Peaches, Diced (1 1/2 Cups) 2/3 Cup White Chocolate Chips

Heat oven to 375F. Line a cookie tray with parchment.

Combine the flour, brown sugar, baking powder, salt, cinnamon, nutmeg, and ginger. Toss 2T of the mixture with the peaches. Set aside. Cut the butter into the flour, then add the buttermilk. Fold in the peaches mix and white chocolate.

Scoop the dough onto the prepared tray and bake for 12 minutes or until golden and cooked through.

Makes 12, Recipe Adapted from sweetpeasandsaffron

For more delicious recipes by our Teen Chef, Kayla, check out her blog, The Nerdy Chef!